This guide shows how to tint car windows easily and effectively, whether doing it yourself or understanding the process for professional help. Tinting car windows protects against UV rays, keeps the car cooler, adds privacy, and can improve the car’s look. It may sound complicated, but with the right steps and tools, anyone can get great results.
The article covers everything needed to start tinting, including picking the right film, preparing the windows, and avoiding common mistakes. Readers will also learn about the legal rules for window tinting and how to take care of tinted windows after installation. This clear, step-by-step guide answers the most common questions and helps anyone feel confident about tinting car windows.
Key Takeways
- Window tinting helps block UV rays and control car temperature.
- Proper preparation and careful application are key for smooth tinting.
- Knowing legal limits and how to maintain tint keeps it lasting longer.
Benefits of Tinting Car Windows
Tinting car windows offers practical advantages that improve comfort and safety during drives. It helps reduce harmful sun exposure, adds privacy, and protects the vehicle’s interior from damage.
UV Protection
Window tint blocks up to 99% of harmful ultraviolet (UV) rays from the sun. This protection reduces the risk of skin damage and eye strain for anyone inside the vehicle. Long-term exposure to UV rays can cause skin issues, so tinting helps keep passengers safer on sunny days.
Tinting also shields the car’s interior from fading and cracking. Upholstery, dashboards, and plastics break down faster when exposed to constant sunlight. By reducing UV exposure, the tint helps maintain the car’s interior materials for a longer time, preserving its appearance and value.
Privacy Enhancement
Car window tinting increases privacy by making it harder for others to see inside. This can deter theft by keeping valuables out of sight. It also provides privacy for passengers, especially in crowded areas or while parked.
Different tint levels offer varied privacy options. Darker tints block more visibility but may be regulated by law in some states. Lighter tints still reduce glare and visibility without completely darkening the windows. Choosing the right tint lets drivers balance privacy needs with legal limits and safety.
Interior Preservation
Tinting protects the interior from heat buildup, which keeps the cabin cooler on hot days. Reduced heat prevents damage to materials like leather, vinyl, and plastic. It also lowers the risk of dashboard warping or discoloration.
Keeping the interior cooler means the air conditioner doesn’t have to work as hard. This can improve fuel efficiency by reducing energy use. Maintaining a cooler, well-preserved interior helps keep the car looking newer and can increase its resale value over time.
Types of Window Tint Film
Window tint films vary in how they block heat, offer privacy, and resist fading. Some are affordable but less durable, while others cost more but provide better protection and clarity. Each type has unique features that suit different needs and budgets.
Dyed Film
Dyed film is the most common and affordable window tint. It uses layers of dyed plastic to absorb sunlight, reducing glare and slightly lowering heat inside the car. This type is popular for its dark, matte look, which provides privacy by making it harder to see inside.
However, dyed film does not block much heat compared to other types. Over time, it can fade or turn purple due to exposure to sunlight. It’s a good choice if the main goal is privacy and a simple cosmetic upgrade rather than high performance.
Metalized Film
Metalized film contains tiny metal particles that reflect heat and UV rays. This film is stronger and more durable than dyed film. It improves heat rejection better, helping keep the car cooler.
Because of the metal particles, metalized film can interfere with electronic signals. This might affect GPS, cell phones, or radio reception. It also provides a glossy or shiny finish that some find less appealing. Its durability and heat rejection justify a higher price than dyed film.
Ceramic Film
Ceramic film is a premium option made with non-metallic ceramic particles. It offers excellent heat and UV ray rejection without causing signal interference. This film keeps the car very cool and protects the interior from sun damage.
Ceramic tint is durable and resistant to fading or discoloration. It keeps clear visibility both day and night, which helps with driving safety. Due to its advanced performance, ceramic film usually costs more than other types but is favored for its balance of comfort and clarity.
Hybrid Film
Hybrid film combines dyed and metalized layers. This mix provides better heat rejection than dyed film alone, with less signal interference than pure metalized tints. Hybrid tint is a middle-ground choice for those who want performance and affordability.
It looks less shiny than metalized film but offers improved durability over dyed film. Hybrid film reduces glare and provides good privacy as well. It suits drivers who want a tint that works well in many conditions without a high price.
Legal Considerations for Window Tinting
Tint laws vary widely across the U.S. Drivers must understand where tinting is allowed, how dark it can be, and what colors or special tints may be restricted. Compliance helps avoid fines and problems with law enforcement.
State Laws and Regulations
Each state sets its own rules for car window tinting. Some states ban tint on front side windows, while others allow various degrees of darkness. Local cities or counties may also have stricter rules.
It is important to check both state and local laws before tinting. For example, New Jersey and New Hampshire forbid any tint on front windows, but states like Arizona or Florida permit darker tints.
Common rules include:
| State Example | Front Side Windows | Rear Windows | Windshield |
|---|---|---|---|
| New Jersey | No tint allowed | Allowed with limits | No tint below top strip |
| Arizona | Up to ~33% Visible Light Transmission (VLT) | Darker tints allowed | Only top 5 inches allowed |
| Florida | 28% VLT allowed | Any darkness allowed | Top 6 inches allowed |
Permitted Tint Levels
Tint darkness is measured in VLT percent, which shows how much light passes through the window. A lower VLT means darker tint.
States vary in allowed VLT for different windows. Front side windows usually have stricter limits (often 30-50%), while rear windows can be darker. Windshields mostly allow tint only on a strip at the top.
The following table shows typical VLT limits:
| Window Type | Common VLT Range Allowed |
|---|---|
| Front Side Windows | 30% – 50% |
| Rear Side Windows | 15% – 50% or no limit |
| Rear Window | 15% – 50% or no limit |
| Windshield | Usually non-reflective strip (top 4-6 inches only) |
Exceeding these limits can result in fines or tint removal orders.
Chameleon and Colored Tint Restrictions
Many states regulate not just darkness but also the color and reflectivity of tint films. Chameleon tints that change color with angle may be illegal.
Colored tints, including red, blue, green, or gold, are often banned on front side and windshield windows. Some states allow colored tint on rear windows only.
Reflective or mirrored tints are usually limited due to glare concerns for other drivers.
Examples of restrictions:
| Tint Type | Allowed on Front Windows? | Allowed on Rear Windows? | Notes |
|---|---|---|---|
| Chameleon Tint | Often prohibited | Sometimes allowed | Can affect visibility |
| Colored Tint (e.g. red, blue) | Usually banned | Varies by state | Known for potential distractions |
| Reflective/Mirrored | Restricted, usually < 20% reflectivity | Allowed with limits | Limits glare |
Checking state rules ensures tint type compliance and helps avoid costly penalties.
Tools and Materials Needed
Tinting car windows requires specific tools and materials to ensure a smooth and clean application. These include items for applying the film evenly, supplies to clean the glass thoroughly, and sharp cutting tools to trim the tint precisely.
Film Application Tools
The most important tools for applying the tint film are a squeegee and a spray bottle filled with soapy water. The squeegee helps push air bubbles and excess water out from under the film. A spray bottle with a mix of water and a few drops of dish soap makes the film easier to position on the glass.
Lint-free cloths are necessary to dry edges and remove any remaining dust. Some also use a heat gun or hairdryer to seal the film, especially on curved windows. These tools help the film stick properly and create a smooth finish without wrinkles.
Cleaning Supplies
Proper cleaning is key to avoid bubbles and dust trapped under the tint. The glass should be washed with soapy water and wiped using a lint-free microfiber cloth. This removes dirt, grease, and tiny particles.
For stubborn spots, a glass cleaner or rubbing alcohol can be used. Window edges and corners must be extra clean because dirt here can cause the tint to lift later. Avoid using towels or rough cloths that can leave lint on the glass.
Cutting Tools
Cutting the tint film accurately is essential for a professional look. A sharp utility knife or precision razor blade is best for trimming the excess film after it is applied.
It’s important to use fresh blades to avoid jagged cuts. Some prefer a straight edge or ruler to guide the knife when cutting larger sections. Careful cutting prevents damage to the car window seals and ensures the tint fits perfectly to the window shape.
Preparing Your Car Windows
Proper preparation is essential for a smooth tint application. This involves thorough cleaning, accurate measuring, and setting up a suitable workspace. Each step ensures the film adheres well and looks professional.
Cleaning the Windows
Cleaning removes dirt, dust, and grease that can cause bubbles or poor adhesion. Use a glass cleaner and a lint-free cloth or microfiber towel for best results. Avoid oily or ammonia-based cleaners that may leave residue.
Follow these steps for best cleaning results:
| Step | Description |
|---|---|
| 1. Spray cleaner | Apply a strong glass cleaner evenly on glass. |
| 2. Wipe thoroughly | Use a microfiber towel to remove all spots. |
| 3. Scrub edges | Pay special attention to window edges where dirt builds up. |
| 4. Dry completely | Ensure no moisture or streaks remain. |
Cleaning must be done inside and out. Any leftover residue will stop the tint from sticking correctly.
Measuring the Windows
Accurate measurements help cut the tint film to the right size, reducing waste and errors. Each window is measured from edge to edge, including any curves.
She or he should:
- Use a flexible tape measure to follow window contours.
- Note height and width separately.
- Record measurements precisely without rounding.
For multiple windows, keep measurements organized in a table like this:
| Window | Height (inches) | Width (inches) |
|---|---|---|
| Driver side | 24 | 36 |
| Passenger | 24 | 36 |
| Rear window | 18 | 48 |
This reduces mistakes when cutting the tint.
Work Environment Setup
A clean, dust-free workspace prevents debris from getting under the tint film during installation. Choose a well-lit, indoor area with stable temperature to avoid film shrinking or bubbling.
Recommended setup elements:
- Flat work surface: To lay out and cut tint film.
- Dust control: Use an air purifier or wipe surfaces before starting.
- Tools at hand: Spray bottle, squeegee, knife, and towels ready.
- No wind: Avoid outdoor setups where wind can carry dust.
Preparing the work environment carefully saves time and improves the final look.
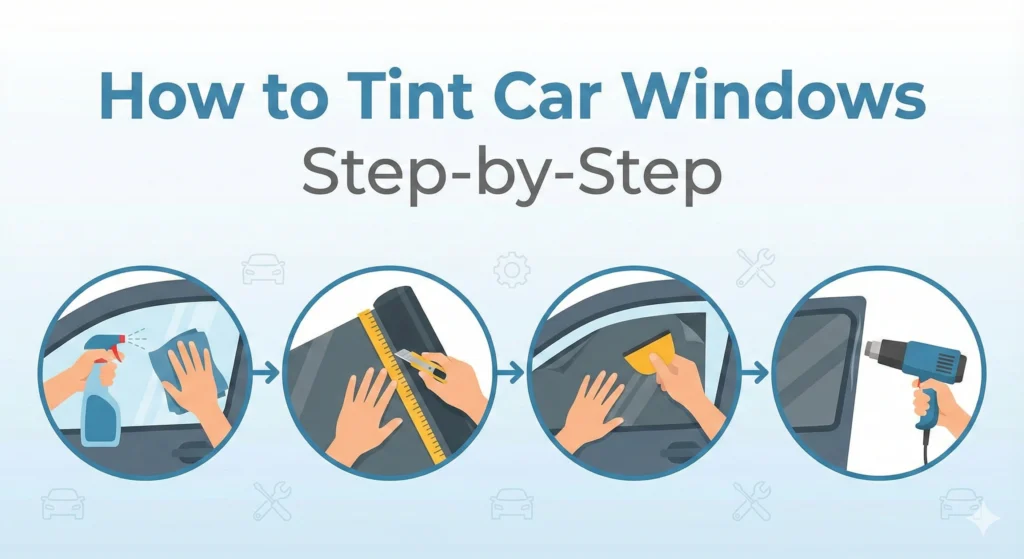
Step-by-Step Guide to Tinting Car Windows
The process of tinting car windows involves careful measuring, precise application, and attention to detail to avoid bubbles and wrinkles. Using the right tools and following each step correctly will help achieve a clean, smooth finish that lasts.
Cutting the Tint Film
The first step is to cut the tint film to fit the exact size of the car window. This requires measuring the window’s height and width carefully. It’s best to add a small margin (about half an inch) around the edges to allow for trimming after application.
After measuring, lay the film on a flat surface with the protective backing still on. Use a sharp utility knife or a precision cutting tool to cut the film. Cutting it slightly larger than the window helps avoid gaps. Always cut slowly and steadily for straight edges.
Applying the Tint Film
Before applying the film, the glass must be cleaned thoroughly. Any dust or grease can cause the tint to bubble or peel. Use a lint-free cloth and a special window cleaner or isopropyl alcohol for cleaning.
Once the window is spotless, spray a solution of water and a few drops of baby shampoo or soap on the glass. This wet surface helps position the film without it sticking immediately. Peel the backing off the tint film carefully, then place the sticky side against the wet glass. Smooth the film from top to bottom, making sure it covers the window evenly.
Removing Air Bubbles
With the film in place, use a plastic squeegee to press out bubbles and excess water. Start from the center and push outward toward the edges. Work slowly to avoid tearing or wrinkling the film.
If small bubbles remain, they usually disappear as the film cures. Larger bubbles can be poked gently with a pin to release trapped air, then smoothed again with the squeegee. It’s important to be patient during this step to ensure the film lays flat and looks professional.
Curing the Film
The tint film needs time to cure and fully adhere to the glass. Curing time depends on the type of film and the climate but typically takes between a few days to two weeks.
During this waiting period, the windows should remain rolled up and handled carefully. Avoid rolling down the windows or cleaning the tinted surface to prevent damage. Proper curing ensures the film sticks well, resists peeling, and provides long-lasting protection.
Common Tinting Mistakes and How to Avoid Them
Many issues during window tinting come from errors made while handling or fitting the tint film. Proper placement, careful handling, and precise cutting are essential for a clean, lasting finish. The most frequent mistakes cause bubbling, peeling, or uneven edges that make the tint look bad or fail early.
Incorrect Film Positioning
Putting the tint film in the wrong place is a common problem. If the film is not aligned properly, it may cover parts of the window that need to stay clear for visibility or break safety laws. Positioning errors also lead to air bubbles or wrinkles.
To avoid this, measure the window carefully before cutting the film. Use gentle, even pressure during application to smooth the film from the center outward. Doing this pushes air out and stops bubbles from forming. Working in a clean area free of dust is also key because dust trapped under the film reduces adhesion and causes imperfections.
Damage During Installation
Tint film can tear or crease easily during installation. Using sharp tools or applying too much force may damage the film, causing permanent marks or holes. Improper handling also risks stretching the film, which creates distortion.
Installers should handle the tint gently, avoid rough surfaces, and use a soft squeegee for smoothing. Keeping the film wet during the process helps reposition it without tearing. Patience is important—rushing can make damage more likely.
Improper Trimming
Cutting the tint film too large or uneven creates visible edges that peel away over time. Cuts that are too small leave gaps, exposing the glass and reducing protection and privacy.
Accurate trimming with a sharp blade is crucial. Many pros trim after placing the film on the window, using the window frame as a guide. Cutting slowly and steadily prevents jagged edges. It also helps to re-check measurements before starting the cut to avoid mistakes.
Maintaining and Caring for Tinted Windows
Proper care keeps tinted windows clear and intact for years. Regular attention protects the tint from damage and prevents problems like bubbling, peeling, or fading.
Cleaning Tinted Windows
Using the right cleaning products is key. Avoid ammonia-based cleaners, as they can damage the tint film. Instead, use a mix of distilled water and mild soap or an ammonia-free glass cleaner.
Clean the windows gently with a soft microfiber cloth to avoid scratching the surface. Wipe in a circular motion, applying light pressure. Cleaning once a week helps prevent dirt buildup, which can cause discoloration.
Avoid harsh scrubbing or abrasive materials. After cleaning, dry the window with a clean cloth to stop water spots or streaks.
Avoiding Scratches and Peeling
To prevent scratches, do not use abrasive sponges or razor blades on tinted windows. Dust and grit can scratch the film, so it’s best to rinse the window with water before wiping.
Peeling can occur if the tint is exposed to harsh chemicals or excessive moisture. Avoid rolling down windows immediately after tinting to allow the adhesive to set fully—usually at least a few days.
Protect tinted windows from direct sunlight when possible, as UV exposure might weaken the adhesive over time. Regular care and careful handling extend the life of the window tint.
Professional vs. DIY Window Tinting
Choosing between professional and DIY window tinting involves weighing cost and skill. The price difference can be large, but so can the risks of poor installation. Skill level affects how well the tint fits and lasts, influencing both appearance and safety.
Cost Comparison
Professional tinting usually costs between $150 and $300. This price covers high-quality films, expert installation, and often a warranty. The warranty protects against bubbling, peeling, or fading over several years.
DIY tinting kits cost much less, usually $20 to $100. Kits include film and simple tools but not the expertise. The biggest savings come at first, but mistakes can lead to costly replacements or poor results that hurt vehicle value.
Cost table:
| Tinting Option | Average Cost | Includes | Warranty |
|---|---|---|---|
| Professional | $150 – $300 | Premium film and labor | Yes, several years |
| DIY Kit | $20 – $100 | Basic film and tools | Usually no |
Skill Requirements
Professional installers have training and experience. They handle cutting film, cleaning glass, and removing bubbles or dust with precision. Installers know how to meet legal tint limits and make the film last longer.
DIY tinting requires careful work and steady hands. Common problems include air bubbles, wrinkles, and misaligned edges. Lack of skill can create visibility issues and may lead to legal fines if the tint is too dark or poorly applied.
People confident in their skills who read instructions carefully may succeed with DIY. However, those unsure or seeking a perfect finish benefit from professional installation.
Troubleshooting Tint Installation Issues
Common problems during tint installation include bubbles forming under the film and the tint peeling or cracking over time. These issues often result from mistakes during application or environmental effects. Fixing them quickly helps keep the tint functional and looking good.
Dealing With Bubbles
Bubbles appear when air or moisture gets trapped between the window and the tint film. They can be tiny or large and usually show up shortly after installation. To fix bubbles, a sharp blade can be used to carefully puncture the bubble and release trapped air. Then, a heat gun or hairdryer helps smooth the area.
If bubbles cover a large area or do not go away after a few days, they may be caused by dirt or debris under the film. In this case, the tint must be removed and reapplied. Prevent bubbles by cleaning the window thoroughly before installation and applying the film slowly to avoid trapping air.
Tint Peeling or Cracking
Peeling or cracking happens when the adhesive fails or the tint is exposed to harsh conditions. It often starts at edges or corners where the film lifts from the glass. To fix peeling, re-adhesive sprays can sometimes restore adhesion for small areas. For cracks, damaged sections usually need complete replacement.
Factors causing peeling or cracking include poor surface preparation, using low-quality tint film, and exposing windows to extreme heat or moisture. Proper installation in clean conditions and choosing good-quality tint reduces these risks. Regularly inspecting the tint can catch damage early before it worsens.
FAQs
Is tinting car windows legal?
Laws vary by state and country. People should check local rules before tinting. Many places have limits on how dark the tint can be.
How long does window tinting take?
Tinting usually takes a few hours. It depends on how many windows are being tinted and the skill of the person doing the work.
Can I tint my windows myself?
Yes, many people do it at home. It requires patience, the right tools, and careful work to avoid bubbles or wrinkles.
What are the benefits of tinting?
Tinting cuts down on sunlight and UV rays. It also helps keep the car cooler, protects the interior, and adds privacy.
| Question | Short Answer |
|---|---|
| Can tint damage windows? | No, if done correctly with quality film. |
| Will tint fade over time? | Some films may fade, but good quality lasts longer. |
| Does tint reduce glare? | Yes, it helps reduce glare from the sun. |
What tools are needed for tinting?
People typically need a spray bottle, squeegee, utility knife, and cleaning supplies. Having all tools ready makes the job easier.
Will tinting affect visibility?
Properly applied tint does not block visibility, especially if legal limits are followed. Too dark tint can reduce visibility at night.
Conclusion
Tinting car windows provides more than just a stylish look. It helps block harmful UV rays, which protects the skin and reduces heat inside the vehicle. This makes driving more comfortable, especially on hot or sunny days.
Privacy is another important benefit. Tinted windows make it harder for others to see inside, which can protect belongings and personal space. However, it is important to check local laws before applying tint, as legal limits on darkness and reflectiveness vary by region.
The process of tinting windows takes time and care. Whether someone chooses to do it themselves or goes to a professional, proper tools and techniques ensure a smooth finish without bubbles or peeling.
Here are key points to remember:
| Benefit | Description |
|---|---|
| UV Protection | Blocks harmful sunlight rays |
| Privacy | Keeps inside of car less visible |
| Comfort | Reduces heat and glare |
| Legal Compliance | Must follow state-specific rules |
A well-applied tint improves both the look and function of a car’s windows. It requires attention to detail but offers lasting advantages when done correctly.