
Car Stereo Upgrade Guide to Transform Your Driving Sound shows you how to plan and perform an upgrade from start to finish. Learn parts, tools, wiring, installation, and tuning in a clear, step-by-step way so you can get great sound fast.
Contents
- 1 Key Takeaways
- 2 Introduction: What this car stereo upgrade guide will teach you
- 3 Step 1: Set goals and budget
- 4 Step 2: Measure your car and check fitment
- 5 Step 3: Choose the right head unit
- 6 Step 4: Choose speakers that match your goals
- 7 Step 5: Choose amplifier and subwoofer
- 8 Step 6: Gather parts and tools
- 9 Step 7: Prepare the car and safety tips
- 10 Step 8: Remove the old head unit and speakers
- 11 Step 9: Install the new head unit
- 12 Step 10: Install speakers and amplifier
- 13 Step 11: Tuning — the final and most important step
- 14 Practical tips and examples
- 15 Troubleshooting: Fix common issues
- 16 When to get professional help
- 17 Maintenance and care
- 18 Conclusion: Wrap up your car stereo upgrade guide
- 19 Author
Key Takeaways
- Point 1: Planning matters — know your goals and budget before buying parts.
- Point 2: Choose the right head unit for features and fitment.
- Point 3: Match speakers and amps for clean power and clear sound.
- Point 4: Use the right wiring and install kit for safe, reliable connections.
- Point 5: Test and tune after installation for best results.
- Point 6: Troubleshoot common issues like no power, noise, and weak bass.
Introduction: What this car stereo upgrade guide will teach you
This car stereo upgrade guide will walk you through every step. You will learn how to plan an upgrade. You will pick a head unit, choose speakers, add an amp or subwoofer, and handle wiring. You will also learn installation tips, testing steps, and how to fix common problems. The goal is clear: better sound in your car that matches your budget and skill level.
Step 1: Set goals and budget
Start with a short plan. Decide what you want to fix. Do you want better clarity? More bass? Bluetooth and phone features? Or a show-level system? Pick a realistic budget. Basic upgrades can be done for a few hundred dollars. A pro-level system can cost thousands.
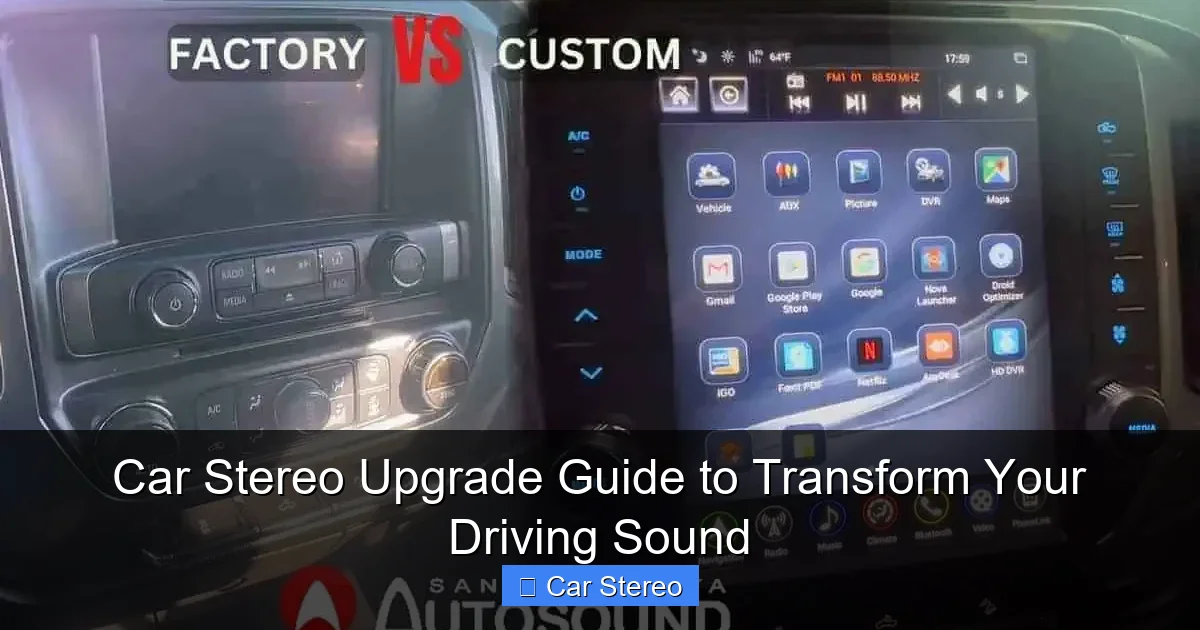
Visual guide about Car Stereo Upgrade Guide to Transform Your Driving Sound
Image source: santaclaritaautosound.com
Define your sound goals
Write down three goals. For example: cleaner vocals, tighter bass, or modern connectivity. These goals guide every purchase. You will avoid buying parts that don’t help.
Set a practical budget
Break the budget into parts: head unit, speakers, amplifier, subwoofer, wiring, and installation. Leave 10% for unexpected parts or tools. This helps you stay on track.
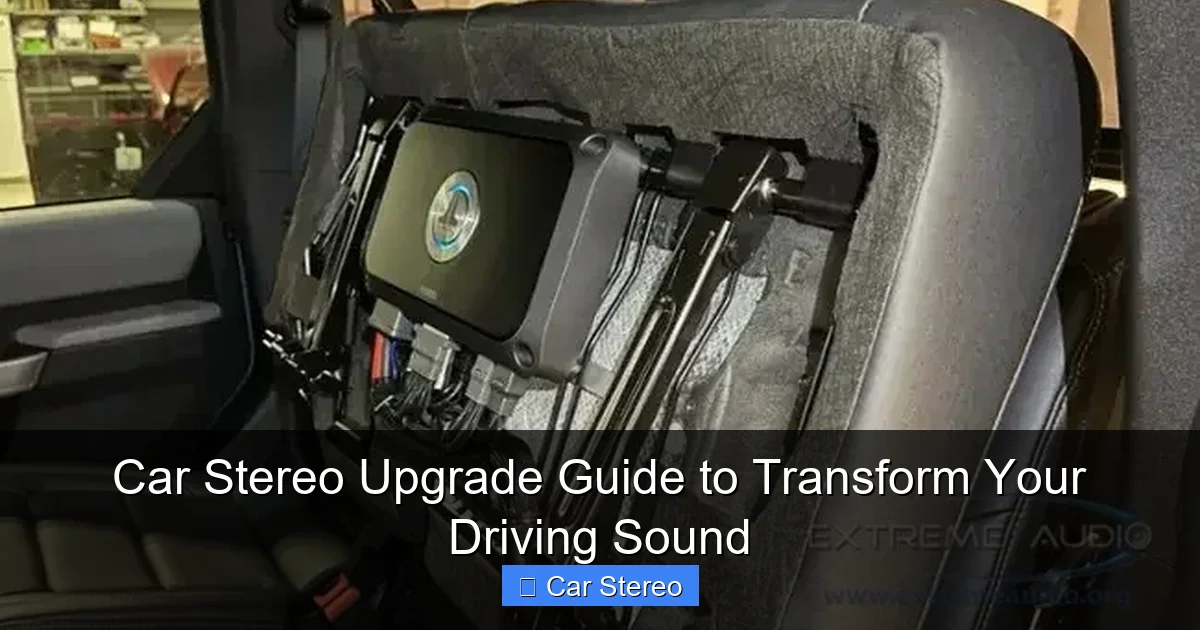
Step 2: Measure your car and check fitment
Before buying, measure speaker openings and dash space. Different cars use different sizes. Check the dash kit compatibility for the head unit. Use an online fit guide or the vehicle’s manual.

Visual guide about Car Stereo Upgrade Guide to Transform Your Driving Sound
Image source: bevwo.com
Check speaker depth and mount type
Check speaker mounting depth. Some aftermarket speakers need more space. If depth is limited, look for slim or shallow-mount speakers.
Confirm head unit size
Car radios usually come in single-DIN or double-DIN sizes. Confirm your dash space. If you want a double-DIN touchscreen but your car is single-DIN, you may need a dash kit or dash modification.
Step 3: Choose the right head unit
Your head unit is the system brain. It affects sound, features, and user experience. Choose one that matches your goals.
Visual guide about Car Stereo Upgrade Guide to Transform Your Driving Sound
Image source: autostereoguide.com
Basic, mid-range, or premium?
Basic units add Bluetooth and USB. Mid-range units add better DACs, equalizers, and more sources. Premium units add large touchscreens, Apple CarPlay, Android Auto, and advanced tuning options.
Key features to look for
- Preamp outputs (RCA): If you plan to add an amplifier, pick a unit with RCA outputs. At least two pairs are good for front and rear or front, rear, and subwoofer.
- Built-in DSP: A digital signal processor simplifies tuning.
- Connectivity: Bluetooth, USB, CarPlay/Android Auto, and backup camera inputs.
Step 4: Choose speakers that match your goals
Speakers define how your music sounds. Choose the right type for each position: coaxial, component, or full-range. Good speakers will make a huge difference.
Coaxial vs component
Coaxial speakers are all-in-one units. They are easy to install and work well for most drivers. Component speakers split the tweeter and woofer. They offer better clarity and imaging. Use components for front stage upgrades.
Match speaker sensitivity and power
Check speaker sensitivity ratings. Higher sensitivity needs less power to reach the same loudness. If planning to use an amplifier, match the speaker’s power handling to the amp’s output. This reduces distortion and protects parts.
Step 5: Choose amplifier and subwoofer
An amplifier brings power. A good amp reduces distortion and improves dynamics. A subwoofer handles low bass that small speakers cannot reproduce.
Picking the right amp
Choose an amp that delivers clean RMS power. Avoid amps that list only peak power. Look for stable power at 2 or 4 ohms. Match amp channels to the speaker layout: 4-channel for front/rear, 2-channel for front or bridging for sub.
Subwoofer choices
Choose sub size and box type for your goals. A sealed box gives tight bass. A ported box gives louder, boomy bass. Match the sub’s RMS power to the amp’s output.
Step 6: Gather parts and tools
Buy a wiring kit. Get correct fuse holders and appropriate gauge wire. An underpowered wire causes heat and noise. Also buy mounting hardware and dash kits if needed.
Essential tools
- Panel removal tools
- Wire strippers and crimpers
- Soldering iron (optional)
- Multimeter
- Socket set and screwdrivers
- Electrical tape and heat shrink tubing
Wiring kit basics
Wiring kits include power wire, ground wire, remote turn-on, RCA cables, and speaker wire. Choose wire gauge by amp power. For amps under 300W, 8 gauge often works. For 300-600W, use 4 gauge. Always follow the amp manual.
Step 7: Prepare the car and safety tips
Park on a level surface and set the parking brake. Disconnect the negative battery terminal before starting. This prevents shorts and protects electronics.
Label connectors and take photos
Take photos of factory wiring and connectors. Label wires if you disconnect many parts. Photos help you restore connections correctly.
Work methodically
Take your time. Keep screws and small parts in labeled containers. Rushing leads to mistakes.
Step 8: Remove the old head unit and speakers
Remove trim panels carefully using trim tools. Unbolt the old unit and disconnect harnesses. For speakers, remove door panels and unscrew speakers. Save original screws and mounting brackets.
Deal with factory amplifiers
Some cars have factory amps and complex wiring. If unsure, use a plug-and-play adapter harness. These adapters let you connect new units without cutting factory wires.
Step 9: Install the new head unit
Use a dash kit for a clean fit. Connect the wiring harness adapter to the car wiring. Connect power, ground, ignition, and speaker wires. Connect RCA outputs to the amplifier if you have one.
Test before final assembly
Reconnect the battery and test the head unit. Check power, sound, and features. If everything works, reassemble the dash carefully.
Step 10: Install speakers and amplifier
Mount speakers with the correct screws. Use foam baffles or gasket tape to seal the speaker to the door. For amplifiers, choose a dry, ventilated location. Common spots are the trunk floor or under a seat.
Grounding the amp
Use a short, thick ground wire to a clean metal surface. Sand paint away to get good metal contact. A poor ground causes noise and performance issues.
Routing wires safely
Run power wire through a grommet in the firewall. Keep power and signal wires separate to avoid noise. Use zip ties to secure loose wires.
Step 11: Tuning — the final and most important step
Tuning makes the system sound right. Use simple tools to start and advanced tools for better results. If your head unit has a built-in equalizer or DSP, use it.
Basic tuning steps
- Set gains: With the volume low, increase amp gain until you hear clean sound. Avoid distortion.
- Set crossovers: Use high-pass filters for full-range speakers and low-pass filters for subs.
- Adjust EQ: Cut or boost narrow bands to fix harshness or muddiness.
Advanced tuning tips
Use an SPL meter or smartphone app to measure levels. Use time alignment to make the soundstage appear in front of you. If you have a DSP, set delays per speaker to match listening position.
Practical tips and examples
Here are quick wins and common examples from real installs. These will save time and improve sound.
Example 1: Clearer vocals on a budget
Replace only the front speakers with quality 2-way components. Add a small 4-channel amp for power. Tune the head unit to reduce low mid muddiness. This is cost-effective and gives a big improvement.
Example 2: Deep, tight bass
Add a sealed subwoofer and a mono amp. Use a low-pass filter around 80-100 Hz. Tighten the gain and tune the bass boost carefully. Sealed subs give fast response and tight bass for most music.
Example 3: Modern features and clean sound
Install a double-DIN head unit with CarPlay. Add a small DSP and keep factory speakers if they are decent. The DSP will fix tonal balance and add sound staging without full speaker replacement.
Troubleshooting: Fix common issues
Problems can happen. This car stereo upgrade guide lists common faults and fixes. Start with simple checks.
No power to the head unit
Check the fuse in the wiring kit and the car fuse for the stereo. Ensure the ground is solid. Verify the harness is connected properly. Use a multimeter to check for 12V at the harness.
No sound from speakers
Check speaker wiring and fuses. Ensure the head unit is set to the correct output mode. If using an amp, verify the remote turn-on wire has 12V when the head unit is on.
Humming or alternator noise
Check ground connections. Move RCA cables away from power wires. Use a noise filter or ground loop isolator if noise persists. Good grounding usually solves hum.
Weak bass or distortion at high volume
Check amp gain settings. Ensure the amp gets enough power with the right gauge wire. Verify subwoofer impedance matches the amp. Replace blown speakers if needed.
Screen or feature glitches
Update the head unit firmware if available. Reset to factory settings if odd behavior continues. Check compatibility notes for CarPlay or Android Auto.
When to get professional help
Some installs need a pro. Complex factory systems, airbag wiring, or hidden amplifiers are reasons to call a shop. If you lack tools or confidence, a pro saves time and risk.
Maintenance and care
Keep the system clean and dry. Avoid over-driving speakers. Check wiring and mounts periodically. Updating firmware can add features and fix bugs.
Conclusion: Wrap up your car stereo upgrade guide
This car stereo upgrade guide helps you plan, buy, install, and tune a better system. Start with goals and a budget. Pick the right head unit, speakers, and amp. Use the right wiring and tools. Test and tune for the best sound. If you hit trouble, use the troubleshooting tips here or seek a pro. With patience and the right steps, you will transform your driving sound and enjoy music like never before.
🎥 Related Video: Upgrading Your Car Sound System For BETTER Audio #cambridgecaraudio
📺 Cambridge Car Audio
Upgrade your Porsche’s sound system with an Audison Thesis 6.5-inch woofer! Watch as we install this high-performance …