
Harley Davidson torque specifications ensure every bolt on your motorcycle is tightened to the correct strength — keeping your engine, wheels, and brakes performing safely and reliably. Knowing and applying these exact torque values helps you avoid stripped threads, loose parts, and costly repairs during regular maintenance or upgrades.
Key Takeaways
- Use factory torque specs to keep your Harley Davidson safe and reliable.
- Tighten bolts correctly to prevent damage and improve performance.
- Follow model-specific charts for accurate maintenance and bike detailing.
- Check torque tools regularly to ensure proper calibration and accuracy.
- Maintain consistent torque for smoother rides and better fuel efficiency.
Every Harley Davidson rider knows precision matters — especially when it comes to tightening bolts and fasteners. Yet, many overlook how crucial torque specifications are for safety and performance. If you’ve ever wondered how tight is too tight or not tight enough, this guide breaks it down in plain language. You’ll learn exactly how to find, use, and apply the correct torque values for your Harley Davidson with confidence — starting right below.
Contents
What Is Torque — And Why It Matters
Torque is the twisting force that makes parts turn, like when you tighten a bolt or twist a wrench. It’s measured in foot-pounds (ft-lb) or Newton-meters (Nm). In simple terms, torque tells you how much force you apply when fastening parts on your Harley Davidson motorcycle.
Using the right torque keeps parts secure without breaking or loosening. Too much torque can strip threads or crack parts. Too little torque can make bolts come loose, creating safety risks. Correct torque helps your motorcycle stay safe, efficient, and smooth to ride.
Torque also affects how your engine and suspension work. Harley engines are built for strong low-end torque, giving that signature pull and rumble. When bolts and parts are tightened properly, they work together as designed. This helps your bike maintain balance, handling, and reliability on every ride.
To learn more about how torque influences motorcycle performance, you can explore related resources from Car and Driver and NHTSA for safety standards and maintenance tips.
Difference Between Torque and Horsepower
Torque and horsepower are related but different. Torque measures twisting power, while horsepower measures how fast that power is delivered. Torque gives your Harley its instant pull from a stop. Horsepower keeps it going fast at higher speeds.
In everyday riding, torque matters more for control and comfort. Harley-Davidson engines are tuned to deliver high torque at low RPMs, which is why they feel powerful even at moderate speeds. Correct torque on bolts keeps that performance steady and dependable.
Why Torque Matters for Harley-Davidson Riders
Torque isn’t only about engine output — it’s about mechanical precision. Every nut, bolt, and fastener needs the right amount of force to do its job safely. From the cylinder head to the axle nuts, each component has a specific torque requirement.
When torque values are correct:
- The engine maintains proper compression and alignment.
- The wheels stay balanced for smooth riding.
- The brakes perform safely and consistently.
Neglecting torque specs can lead to uneven wear, leaks, or component failure. Following proper torque ensures long-lasting reliability and safety for your Harley Davidson.
The Legacy of Harley-Davidson and Its Engineering Philosophy
Harley-Davidson has built motorcycles known for power, durability, and that unmistakable sound. The company’s engineering philosophy focuses on mechanical strength, precision fit, and long-term reliability.
From the early Knucklehead engines of the 1930s to today’s Milwaukee-Eight powerplants, Harley engineers design every component to handle high torque and vibration. Each bolt and bracket plays a role in keeping the bike stable at all speeds.
A Short History of Harley-Davidson Torque Heritage
Founded in 1903, Harley-Davidson grew from a small Milwaukee workshop into a global icon of American engineering. Through decades of innovation, Harley refined its torque management — from basic hand-tightened bolts to exact digital torque specs in modern service manuals.
Today, Harley’s factory assembly lines use precise torque tools to ensure each bike leaves the plant meeting tight tolerances. The company’s focus on torque consistency is one reason Harley engines are known for lasting hundreds of thousands of miles when maintained correctly.
Harley’s Design Focus on Strength and Balance
Each Harley-Davidson motorcycle is built around a torque-first design. The heavy flywheel, strong crankcase, and thick frame all work together to manage vibration and maintain balance. Correct torque on fasteners helps keep that harmony intact.
When bolts are tightened to spec, the frame resists flex, and the engine runs smoother. Even small components — like handlebar clamps and axle nuts — rely on proper torque to maintain stability during long rides.
Torque also supports vibration control. Harley engines produce strong pulses, so bolts can loosen over time. Regular torque checks prevent issues like rattles, leaks, or shifting components, which can affect comfort and safety.
Why Torque Reflects Harley’s Reliability Philosophy
Harley-Davidson’s reliability depends on precision assembly and repeatable maintenance. The company publishes torque values in every service manual for a reason — it’s part of their quality guarantee.
Following these factory torque specs keeps the bike performing as intended. It also helps owners maintain warranty compliance and avoid costly repairs. Every torque value represents hours of testing to ensure the perfect balance between strength and flexibility.
Here’s a simplified example of how torque values connect to Harley’s engineering:
| Component | Purpose | Typical Torque Range* | Function |
|---|---|---|---|
| Cylinder Head Bolts | Seal head to cylinder | 20–40 ft-lb | Maintains compression |
| Crankcase Bolts | Join engine halves | 15–30 ft-lb | Prevents leaks and misalignment |
| Axle Nuts | Secure wheels | 65–85 ft-lb | Keeps wheel tracking true |
| Brake Caliper Bolts | Attach caliper to fork | 25–35 Nm | Ensures braking stability |
| Primary Cover Bolts | Seal primary drive | 80–120 in-lb | Prevents fluid leaks |
*Values are general examples. Always verify the exact specification in your Harley-Davidson service manual or from an authorized dealer.
For model-specific details, visit Harley-Davidson’s official service site or consult trusted sources like Edmunds for verified motorcycle maintenance information.
How to Use Torque Specifications Properly

Using the correct torque specifications on your Harley Davidson ensures every bolt is tight enough to hold, but not so tight that it causes damage. Torque settings are precise, and even small errors can affect your motorcycle’s safety and performance.
The key is to use trusted data and the right tools. Harley provides factory torque charts in owner’s and service manuals for every model. These numbers are tested to protect the engine, suspension, and frame.
Torque values can change based on bolt size, material, and lubrication. Always check whether the fastener should be dry, oiled, or treated with threadlocker. This detail is just as important as the number itself.
For a deeper look at correct motorcycle maintenance standards, visit NHTSA’s motorcycle safety guide or explore Car and Driver’s maintenance section.
Finding the Right Torque Source
Use official Harley-Davidson manuals for your exact model and year. Avoid guessing or relying only on online charts that aren’t verified. Factory manuals include the torque for every major component, from engine bolts to brake calipers.
If you don’t have the manual, you can access digital copies or guides from authorized dealers or Harley’s service portal. Aftermarket books, like Clymer or Haynes, can also provide reliable specs when official data isn’t available.
Understanding Torque Units and Conditions
Torque is measured in foot-pounds (ft-lb), inch-pounds (in-lb), or Newton-meters (Nm). Harley-Davidson often uses a mix of these units depending on bolt size.
- Small fasteners: 80–120 in-lb range
- Medium bolts: 15–30 ft-lb range
- Large components (axles, mounts): 65–85 ft-lb or higher
Conditions matter. A bolt tightened to 30 ft-lb dry will clamp differently if oiled or coated. Always match the condition listed in the manual before torqueing.
Tools You Need for Accurate Torque
To apply torque correctly, use a torque wrench. It measures how much force you apply and ensures consistency across fasteners. There are three main types:
| Torque Wrench Type | Description | Accuracy Level | Best For |
|---|---|---|---|
| Click-Type | Clicks when the set torque is reached | ±4% | General motorcycle use |
| Beam-Type | Uses a pointer and scale to show torque | ±5–6% | Visual confirmation |
| Digital | Displays torque on a screen | ±2% | Precision maintenance |
Other helpful tools include extension bars, torque adapters, and calibration testers. These help when working on tight spots or critical areas like the engine mounts or wheel axles. Always store your torque wrench at its lowest setting to protect its spring.
Step-by-Step Torque Application
- Clean all threads before tightening.
- Confirm whether bolts need lubrication or threadlocker.
- Tighten by hand first, then use a torque wrench in stages.
- Follow the tightening pattern shown in your Harley service manual.
- Recheck torque after the first ride or heat cycle.
For a detailed step-by-step maintenance example, you can review guides on Edmunds motorcycle maintenance tips.
Torque Specification Tables / Charts
Harley-Davidson torque specs differ by model and component, but some general reference ranges can help guide you during regular maintenance. Always verify your model’s exact torque values before tightening.
The table below lists common torque points across Harley motorcycles:
| Component | Torque Range | Unit | Purpose |
|---|---|---|---|
| Cylinder Head Bolts | 20–40 | ft-lb | Seals head to cylinder, maintains compression |
| Crankcase Bolts | 15–30 | ft-lb | Holds engine halves together, prevents oil leaks |
| Rocker Box Fasteners | 10–20 | ft-lb | Secures valve covers, prevents warping |
| Primary Cover Bolts | 80–120 | in-lb | Seals primary drive housing, avoids leaks |
| Clutch Assembly Bolts | 15–25 | ft-lb | Ensures smooth clutch operation |
| Transmission Mounting Bolts | 25–45 | ft-lb | Aligns drivetrain and reduces vibration |
| Front Axle Nut | 50–70 | ft-lb | Secures wheel, maintains alignment |
| Rear Axle Nut | 65–85 | ft-lb | Keeps rear wheel in place under load |
| Fork Clamp Bolts | 18–25 | ft-lb | Holds fork tubes securely |
| Brake Caliper Bolts | 25–35 | Nm | Keeps caliper stable for consistent braking |
| Brake Rotor Bolts | 30–45 | Nm | Maintains rotor alignment and prevents pulsation |
| Master Cylinder Bolts | 15–20 | Nm | Secures master cylinder and prevents leaks |
Note: Torque ranges are general examples. Always check your Harley-Davidson service manual or an authorized dealer for model-specific data.
How to Read the Table
- Component: The part you are tightening.
- Torque Range: The safe zone between minimum and maximum force.
- Unit: Make sure your torque wrench matches the unit shown.
- Purpose: What proper torque protects or ensures.
Correct torque isn’t just about following numbers — it’s about understanding why each setting matters. Properly tightened fasteners help your Harley stay balanced, reduce wear, and extend component life.
For verified model-specific charts, visit the Harley-Davidson Service Information Portal or check trusted maintenance data on Kelley Blue Book.
Key Component Areas & Their Torque Needs
Every part of your Harley-Davidson motorcycle relies on precise torque for safe performance. The right tightening force keeps parts from moving, leaking, or breaking under vibration and stress. Each component — from the engine to the brakes — has its own torque range and tightening pattern.
The following sections explain the most important areas where accurate torque matters most. These examples apply to common Harley models, but always confirm your exact model’s settings in the official service manual or at an authorized dealer.
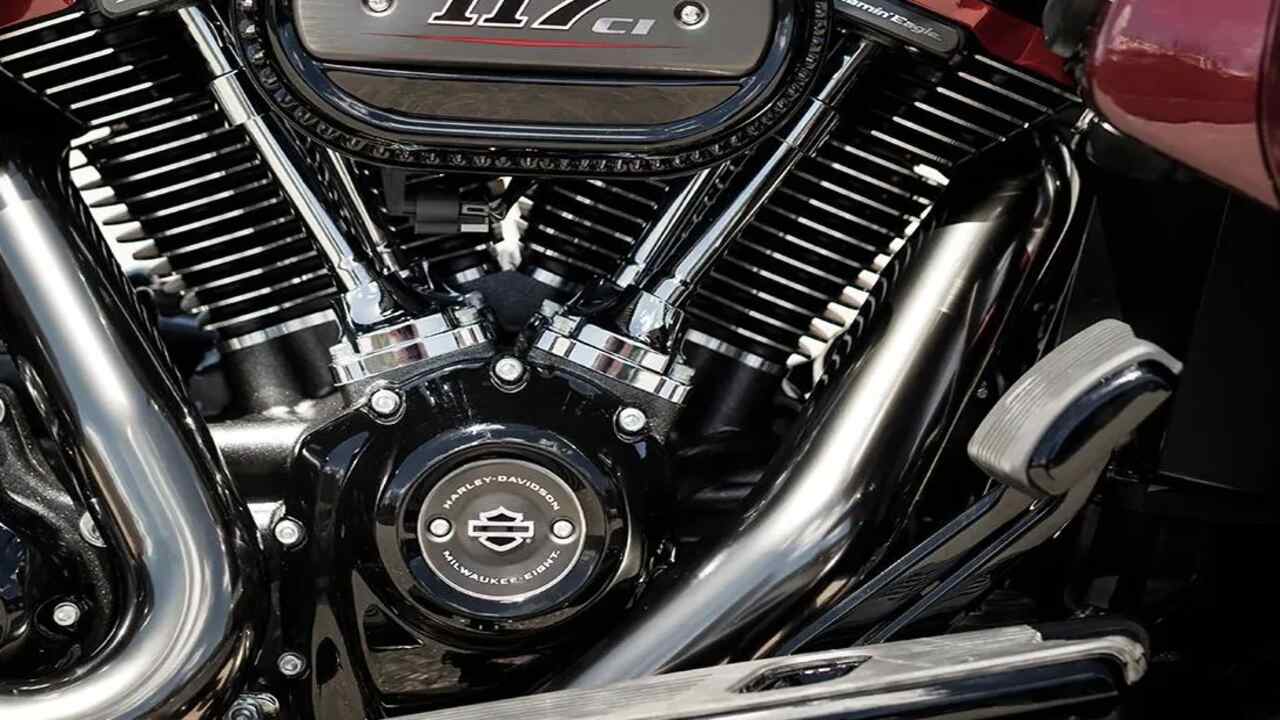
Engine / Cylinder Head Bolts / Crankcase Bolts
The engine produces strong torque, vibration, and heat. If bolts are not properly tightened, leaks and misalignment can occur.
| Engine Component | Typical Torque Range | Unit | Purpose |
|---|---|---|---|
| Cylinder Head Bolts | 20–40 | ft-lb | Seals the head to the cylinder, maintaining compression |
| Crankcase Bolts | 15–30 | ft-lb | Joins engine halves and prevents oil leakage |
| Rocker Box Fasteners | 10–20 | ft-lb | Secures rocker covers, prevents oil seepage |
Use a cross-pattern tightening method to spread force evenly. Start at low torque, then increase gradually to full torque. Lightly oil bolts if recommended in your model’s chart.
Correct torque keeps your Harley’s engine compression steady, ensuring smooth idle and power delivery. It also prevents warping of the cylinder head and uneven gasket wear.
For deeper insights on engine care and torque importance, review Car and Driver’s motorcycle maintenance section and NHTSA’s safety resources.
Drivetrain (Primary Cover Bolts, Clutch Fasteners, Transmission Mounts)
The drivetrain transfers power from the engine to the rear wheel. It includes the primary drive, clutch, and transmission mounts, each needing proper torque to work smoothly and safely.
| Drivetrain Component | Typical Torque Range | Unit | Purpose |
|---|---|---|---|
| Primary Cover Bolts | 80–120 | in-lb | Seals the primary drive and prevents fluid leaks |
| Clutch Assembly Bolts | 15–25 | ft-lb | Keeps clutch plates aligned and prevents slippage |
| Transmission Mounting Bolts | 25–45 | ft-lb | Aligns transmission and reduces vibration |
Always tighten these bolts evenly in a crisscross pattern. Over-tightening can distort the cover or clutch components, while under-tightening can cause leaks or clutch chatter.
Use blue threadlocker on clutch and transmission fasteners to prevent them from loosening due to vibration. Check torque again after 100–200 miles to ensure nothing has shifted.
Accurate torque on drivetrain bolts improves gear shifting, reduces wear on chains or belts, and keeps your Harley’s power delivery consistent through every ride.
Common Mistakes When Applying Torque
Applying torque may seem simple, but even small mistakes can lead to major mechanical problems. Understanding what to avoid keeps your Harley safe and helps you maintain its performance over time.
Over-Tightening Risks
Over-tightening is one of the most common torque mistakes. When you use too much force, you can strip threads, crack parts, or distort gaskets. For example, applying extra torque to brake caliper bolts can warp the caliper and reduce braking performance.
Too much torque can also make bolts impossible to remove without damage. This mistake often happens when using low-quality or uncalibrated torque wrenches. Always stop tightening once your wrench clicks or shows the correct reading.
Under-Tightening Consequences
Under-tightening is just as dangerous. Bolts that are too loose can vibrate loose during a ride, causing leaks or part failure. Loose axle nuts, for instance, can lead to wheel wobble and poor handling — a serious safety hazard.
Always double-check torque readings on high-vibration parts like the engine mounts, exhaust brackets, and brake system. Retorque these after your first few rides or whenever you replace parts.
Using the Wrong Tools
Torque accuracy depends on using the right wrench and socket size. Cheap or worn-out tools can produce incorrect readings. Avoid using standard ratchets or power tools for precision tightening.
| Tool Error | Result | Solution |
|---|---|---|
| Using old or uncalibrated wrench | Incorrect torque readings | Calibrate yearly or after heavy use |
| Applying torque too fast | Inaccurate pressure buildup | Tighten slowly and steadily |
| Wrong unit conversion (in-lb vs ft-lb) | Over-tightening or under-tightening | Match units with the service manual |
| Skipping torque sequence | Uneven force on components | Follow pattern shown in Harley manual |
Always calibrate torque wrenches at least once a year. Store them at their lowest setting when not in use to protect the spring.
For more guidance on proper tool usage and care, check expert advice from Edmunds or professional mechanic resources on AutoTrader.
By avoiding these mistakes, you’ll keep your Harley-Davidson motorcycle performing safely, extend component life, and reduce repair costs in the long run.
Conclusion
Every Harley-Davidson motorcycle is built on precision, strength, and balance — and torque specifications are what hold that legacy together. When every bolt is tightened to the right value, your bike runs smoother, lasts longer, and stays safer on every ride.
Following factory torque specs isn’t just about numbers — it’s about protecting performance and reliability. Whether you’re maintaining the engine, adjusting the drivetrain, or replacing brake parts, proper torque ensures all components work together as designed.
Use a calibrated torque wrench, follow your model’s service manual, and recheck fasteners after long rides or heat cycles. These simple habits prevent costly mistakes and keep your Harley performing like new.
Precision torque isn’t just a maintenance step — it’s part of responsible motorcycle ownership. Keep your Harley tuned, torqued, and road-ready for the miles ahead. For further guidance on maintenance and safety standards, visit trusted resources such as NHTSA, Car and Driver, and Harley-Davidson’s official service site.